In this article, we'll cover:
- Manage Notification settings of your monitored areas
- Understanding Advanced Notification settings
- Choosing the right settings for your needs
Accessing Notification Settings
Notification settings can be tailored for each monitored area, allowing you to receive alerts only for the incidents that matter most to you.
For instance, during peak wildfire season, you may want to receive notifications for all new detections, while in quieter seasons, fewer notifications may suffice.
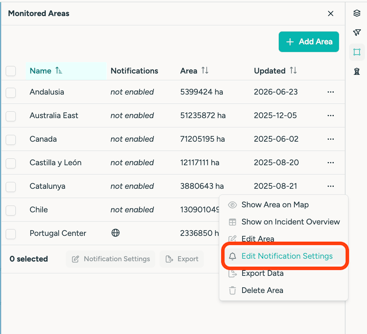
- Open the "Monitor" menu.
- Locate your monitored area in the list.
- Click on the "..." button.
- Scroll down and select "Edit Notification Settings".
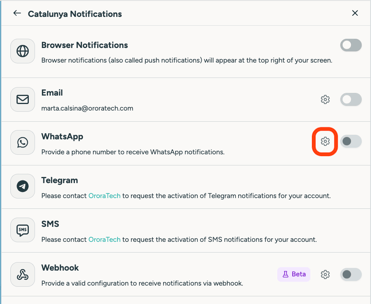
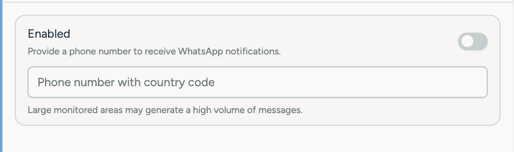
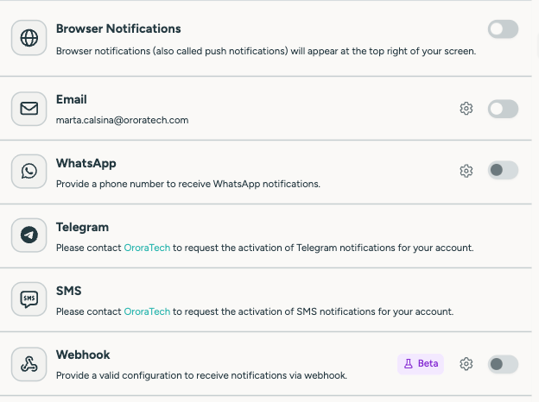
- Select your preferred channel by activating the toggle.
- Select on the Settings button to access the criteria meu
Adjusting Notification Criteria
Verify Criteria
- Ensure all criteria are correct.
- Adjust settings by interacting with the provided buttons and actionable items.
- Enter you email, WhatsApp Number or SMS Number
- Update related information as needed
Trigger Criteria
Select which fire detections should trigger a notification.
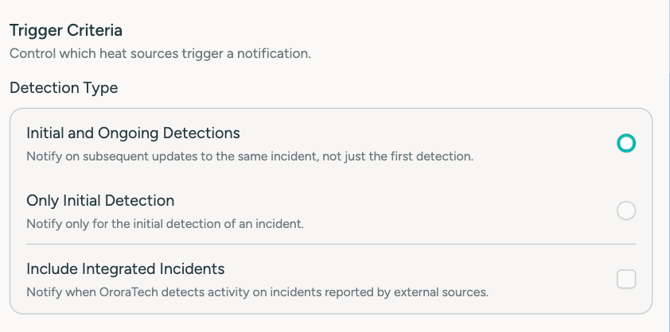
Enable Only Initial Detections to receive alerts only for the first detection of a new fire cluster.
Instead of notifying you about every new detection within the same incident, WFS will only notify you when the fire is initially identified.
This helps you:
- Reduce notification noise
- Focus on new wildfire incidents
- Prioritize early response
💡 Recommended for most users, especially during periods of high fire activity.
Satellite Notifications:
Choose which satellite detections should generate notifications.
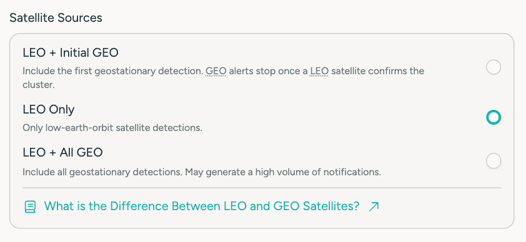
💡 We recommend setting it as LEO + Initial GEO at the beginning.
Receive notifications only when a fire is first detected.
Enable Initial Detections Only to receive alerts only for the first detection of a new fire cluster.
Instead of notifying you about every new detection within the same incident, WFS will only notify you when the fire is initially identified.
This helps you:
- Reduce notification noise
- Focus on new wildfire incidents
- Prioritize early response
💡 Recommended for most users, especially during periods of high fire activity.
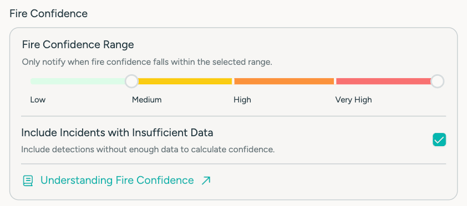
Fire Confidence:
Only receive notifications for incidents within your selected confidence range.
Include Incidents with Insufficient Data
Include detections where there isn't enough information to calculate a confidence level.
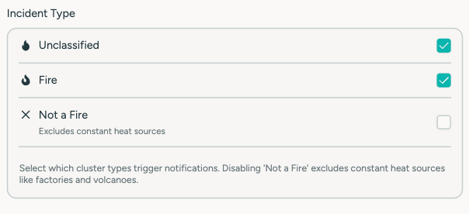
Incident Types
You can choose to receive Notifications only for yet unclassified detections and fires, by unclicking Not a Fire (Exclude constant heat sources)
Content Options
Configuring other Notification Methods
On-demand Notification Methods (Contact support to enable):
- SMS
- Webhook
- Telegram
Finally, to save adjusted settings, please click on the "Update" button.
What Notifications Look Like
To help you better understand the kind of alerts you’ll receive, here are examples of notifications across different channels:
-
Email: Contains a summary of the detected incident, including location, confidence level, and a direct link to view the event in the platform.


-
WhatsApp & SMS: Compact format with key incident details and a clickable link (if supported by your device).
-
Browser Push: Real-time alert banner in your browser with the incident type and area name.
-
Webhook: JSON payload with full incident metadata sent to your configured endpoint (developer documentation available upon request).
Need Help?
In case of questions, reach out. support@ororatech.com at any time.
We are happy to set up a short meeting to clarify any doubts you have!