This guide shows you how to:
- How to set up Monitored areas with Sub-area properties yourself
- Configure your alert notifications
- What to do if you encounter problems?
Not sure what Monitored Areas are? Start with Introduction Monitored Areas and Sub-areas
Upload Monitored Areas Yourself (DIY)
You can easily upload your Monitored Areas and Sub-Areas in the platform:
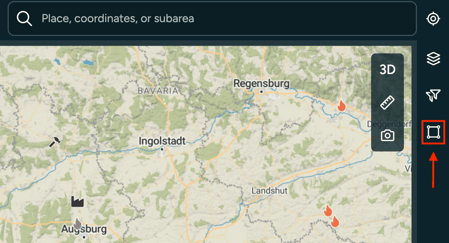
1. Open WFS and go to the Monitored Area menu.
2. Click Add Area and choose one of two options
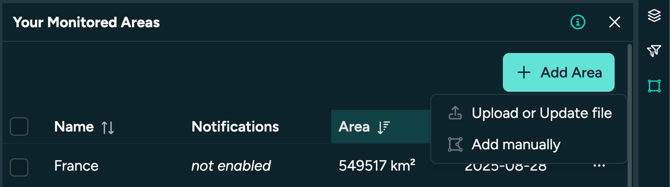
3. Option 1: Add manually
- You can add an area by drawing a polygon on the map by clicking on "Draw" or by clicking on the editing symbol on the right and inserting a WKT string

- Draw an area with your Mouse and finish it by double clicking. This will create a WKT-string: POLYGON((11.96715012031132....)). This can be edited and any WKT-String can be inserted.

- In addition you have to give the area a Name and set Notification methods (more to Notifications on the end of the article).
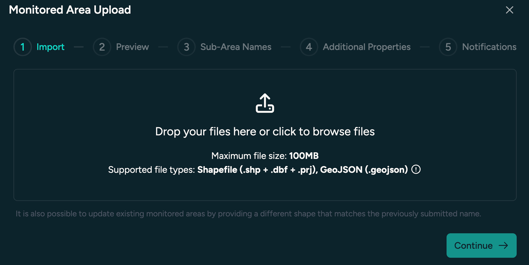
4. Option 2: Upload or Update a file (recommended for most cases)
- Import: Browse and for your file(s) and insert them
-
- Accepted File Formats and requirements:
.geojsonor.shp,.prj,.dbf(Shapefile)- Coordinate system (CRS): EPSG 4326 for .geojson. For shapefile it can be any CRS.
- Sub-Areas can be included as properties/columns in the same file
- Sub-Area properties will not display special characters like mutated vowels (ê, ã, é, ñ, æ, ø)
- Max size: 100MB per Monitored Area (Uploading large Monitored
Areas and/or buffering them via the platform can take a very long time!). Tip: Shapefiles are smaller in file size than GeoJSON files. - Valid polygons only (no nulls or broken geometries)
- Max 2,000 sub-areas per Monitored Area (above that may incur added costs)
- without special characters like mutated vowel (ê, ã, é, ñ )
- Accepted File Formats and requirements:
- Preview: In step 2 you will see a preview of your area. In this example we have the country Greece as a shapefile including it's 13 regions as sub-area properties.
There are two options: Either keep all 13 regions as one Monitored Area by enabling "Dissolve into single monitored area" and giving a name to the area. This gives you the option to add a buffer to the area.
If you would like to update an existing monitored area, give it the exact name and the area will be updated, keeping notification methods unchanged.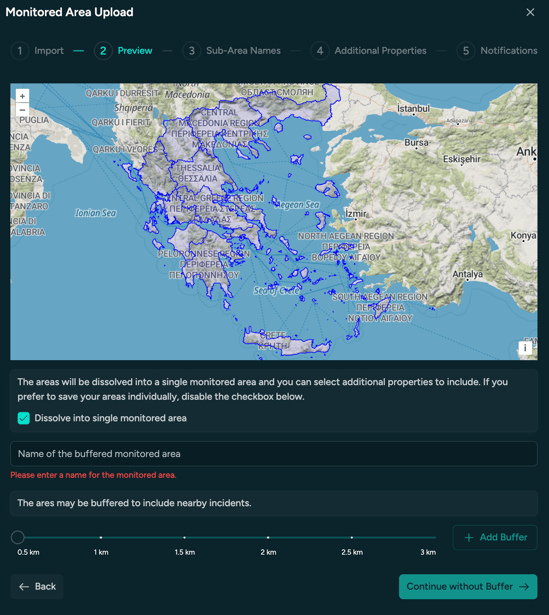
Or do not dissolve into single monitored areas and instead upload all sub-regions as individual monitored areas
📌 If you are an Admin or Owner user, there will be a checkmark which will let you to share the are within the organisation. - Sub-Area Names: After giving an area name and buffering the area (this can take some time), choose the property/column of your file that represents the sub-area properties. In this case column "f_admin" holds the region names.

- Additional Properties: Choose additional properties (in this case id codes of regions) to be added.

- Notifications:
In the final step you can choose the notification methods for your monitored area(s). If you see some Notification methods greyed out like Whatsapp and Telegram in the image below, please ask your Customer Success contact or support@ororatech.com to activate the notification methods for you. You can also skip the Notification settings and do it later but we recommend to set it right away.
For every notification method you can choose Advanced Notification Criteria.
- Choose whether you want to receive notifications about detections from Geostationary Satellites (GEOs). The difference between GEO and LEO (Low Earth Orbit) Satellites is explained here. We recommend Initial.
- For Fire Confidence we generally recommend Medium. Read more about Cluster Confidence.
- Read this article for detailed information about setting notifications and look at our FAQ page about questions you might encounter with notifications.

📋 Checklist Before Upload
- ✅ Valid file format: Shapefile or GeoJSON
-
✅ Valid polygon geometries
-
✅ Valid coordinate system
-
✅ Attribute table includes ID or name column
-
✅ At least one column with no empty fields
Uploading Monitored Areas through the user interface is typically easy and fast. However, certain scenarios may introduce complexity. For example, if your areas are very large and complex and require buffering, if you’re working with a large number of individual Monitored Areas, if our Monitored Areas overlapp, or if unexpected upload issues occur. In such cases, manual upload may become time-consuming or fail entirely. If this applies to you, our team is here to assist you. Visit Let OroraTech Upload Your Monitoring Areas (WIP) to learn how we can support your integration process.
Don't forget that you can contact support@ororatech.com anytime. We are here to help!